See also "Baffling" for more on this subject.
The baffle should be placed just after the focuser, when it is fully racked-in. It should not be connected to the focuser tube. That is, it should not move when the focuser is operated.
This is up to you. It should at least be big enough to allow the lightcone that is used for the fully illuminated area. However the vignetting at the edge of this area will be quite severe. So if you like a more gradual vignetting, then you should make the hole a bit larger. (Note: Vignetting is next to unacceptable for imaging!). Click here for an explanation of this effect. See the picture below for an overview of placing & hole size.

Note: The above drawing only shows the principles, it is not exact. Most noticeable is that the hole in the baffle should be circular.
There is a direct relation between tube length and focuser baffling. Adding a baffle means you can decrease the tube length. In the same sense, a larger baffle hole implies a longer tube. See the the picture below. Also check out the feature "Tube Dimensions".
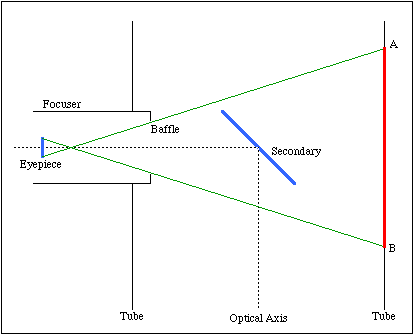
To the above figure: After the size of the baffle is known, the size of the tube opposing the focuser that needs to be present and non-reflective can be calculated. However now the size of the entrance lens of the eyepiece is needed, as a substitute it could also be done with the the same area as in the figure above. (i.e. the fully illuminated field or similar)
The upper green line is drawn from the lowest point of the entrance lens along the highest point of the hole in the baffle until it hits the opposing tube wall. The lower green line is drawn along the opposite points. The red line (A-B) shows the length of the area where no light may come through, or may be reflected. For a truss tube, the red line shows the minimum length of the focuser cage. For tubes, point A determines the minimum length of the tube.
There will be light coming into the focuser from the tube opening (and from below when it's a truss tube) that will be reflected by the walls of the focuser until it reaches the eyepiece. The only way of stopping this is having the focuser walls as non-reflective as possible. Luckily this light enters at a pretty steep angle, so it is relatively easy to stop it. When the tube is long enough a second baffle may prove most effective. This one should then be placed as close to the focal plane as possible. (Remember that barlows go between the focal point and the secondary.)
To determine the size of the baffle hole, use the formula for calculating the size of the secondary. But use the distance between the primary and the baffle (along the optical axis) instead of the distance between primary and secondary. (See "Secondary size" for the formula)
A high (i.e. long) focuser has the advantage of a smaller area opposing the focuser that needs to be present and non-reflective. When using a barlow (see below "A note ...") it is probable that a higher contrast will be obtained as with the low profile focuser. The disadvantage is that it is more complex to baffle (it needs two baffles).
A barlow is placed between the focal point and the secondary. This means that the first lens of the barlow is much closer to the baffle as the above figure (the lower one) indicates. In fact when the focuser length is optimized to get the smallest possible secondary, this lens will be right up to the baffle. This then invalidates the calculation of the tube area opposing the focuser that needs to be present and non-reflective. In fact it is likely to become impossible to have the tube long enough. Then the contrast when using a barlow will not be as good as without the barlow.
Thanks to Nils Olaf Carlin.